BUILD CARD · EASY
Tap-Triggered Blinking LED
Tap the board to energize a blinking LED through a vibration switch.
- Time
- 15 min
- Age
- 8+
- Pieces
- 6
- Board
- 10×7
- Build and check a 10×7 snap-grid circuit from a visual diagram.
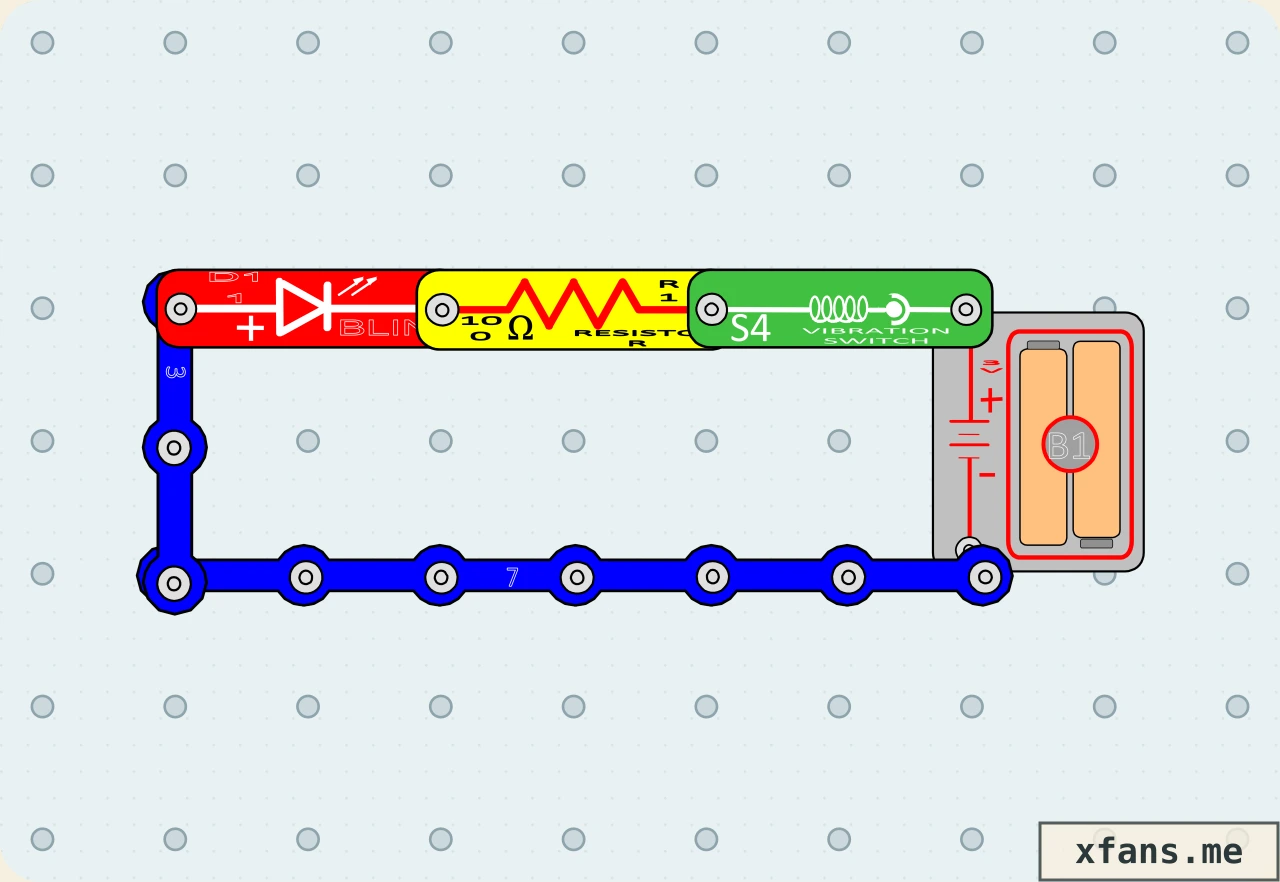
- A vibration pulse powers an LED that also contains its own blinking controller.
02 / PARTS CHECK
Parts list
- 1×7-snap wireconnector
- 1×3-snap wireconnector
- 1×Blinking LEDsemiconductor
- 1×100 Ω resistorresistor
- 1×Vibration switchswitch
- 1×3V two-cell battery holderpower
03 / ASSEMBLY
How to build the circuit
- 1
Disconnect the battery and clear the base grid before placing any part.
- 2
Match the final diagram one grid position at a time, placing connecting wires and lower layers first.
- 3
Check the direction of every LED, diode, transistor, battery, and other terminal-sensitive part.
- 4
Press every shared snap firmly, check that no wire shorts the battery, then connect power last.
04 / FIELD NOTES
How it works
A vibration closes the sensor contacts briefly.
The resistor limits current.
The blinking LED circuit produces its own pulse pattern while powered.
Explore more led circuit projects →
05 / TEST
Test and expected result
- What to do
- Tap the board and observe the LED immediately.
- What to expect
- The vibration contact briefly powers the self-blinking LED.
06 / SAFETY
Build smart
- Use only the 3V two-cell battery holder.
- Never connect the battery terminals directly together.
- Disconnect the battery before moving any component.
07 / TROUBLESHOOTING
If it does not work
- Press every overlapping snap down firmly.
- Check the battery direction and replace weak batteries.
- Compare every component position with the final diagram.
08 / FREQUENTLY ASKED QUESTIONS
Questions about this circuit
What is the main idea behind this circuit?
A vibration pulse powers an LED that also contains its own blinking controller.
What should I check first if it does not work?
Press every overlapping snap down firmly.
09 / RELATED BUILDS
Try a similar circuit
Continue with another build that shares the same components, ideas, or difficulty.